Accessing a site without changing the nameserver through the hosts file
Tutorials • Domains | hosts file | windows | hosting In this tutorial we will follow the steps necessary to access the site hosted on a server without the need to change the nameservers, using the hosts file of the operating system
by Ana RednicViews 824Updated now 3 yearsPublished 24/01/2018
Introduction
- The hosts file of the operating system provides the ability to access hosted sites on a server without the need for a DNS server or to change domain nameservers. It can also be used for development purposes if we do not own the domain, but we have a hosting.
Requirements
- In order to use the hosts file of the operating system, we will need the IP on which the domain we want to access is hosted and the location of the hosts file.
The hosts file is located at the following locations depending on the operating system used:
c:\Windows\System32\Drivers\etc\hosts - Windows
/private/etc/hosts - Mac OS X
/etc/hosts - Linux
Steps
- In this tutorial we will use the Windows operating system as an example. To edit the file, we will start the Notepad text editing application (with administrative privileges) or any other text editor (we recommend Notepad ++) and open the hosts file by clicking File in the top bar, then Open. In this case, we will open the file in the path c: \ Windows \ System32 \ Drivers \ etc \ hosts (the letter c: \ the disk may differ depending on the location of the operating system installation). We will ensure that Notepad has the All Files (*. *) option on the right of the File Name field to view all file types.

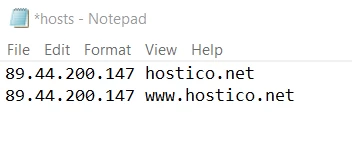
- Once the file has been opened, we will add the following lines:
SERVER_IP_ADDRESS domainexample.xx
SERVER_IP_ADDRESS www.domainexample.xx - As an example, we will use the hostico.net domain hosted on the server with IP 89.44.200.147. In this case, we will add the following lines to the hosts file and save the changes made:
89.44.200.147 hostico.net
89.44.200.147 www.hostico.net - The above mentioned IP and domain are just an example. You will have to use the domain and IP associated with your hosting account. You can find the IP addres of your webhosting account in the email sent by us, uppon activating your services.
- Several domains and subdomains can be added to the hosts file leading to different servers (IPs), the functionality being the same.
- In the next step, we will open a browser and test whether the domain is being loaded from the server that we want. It is recommended to clear the browser cache before you try.
Similar Articles
5
Enabling Cloudflare services in cPanelTutorials • Cloudflare | cpanel | cloudflare | protection
This article will describe the steps required to enable Cloudflare services for domains hosted on your cPanel control panel
by Mihai BobriucViews 1486Updated now 10 monthsPublished 26/09/2017
4
Cancellation of hosting services.Tutorials • Commercial | cancellation | opt-out | subscription | hosting
In this tutorial we illustrate the process by which a hosting service can be canceled from a Hostico customer account.
by Mihai BobriucViews 2670Updated now 1 yearPublished 04/06/2018
3
How to set nameservers in the ROTLD panelTutorials • Domains | nameservers update | rotld
This article will describe the steps required to set or update nameservers on a domain registered with ROTLD
by Ana RednicViews 1478Updated now 1 yearPublished 25/10/2018
2
Recurring payment activation.Tutorials • Commercial | payment | recurring | credit card | monthly
In this article, we will go through the steps required to enable recurring payment on Hostico services
by Mihai BobriucViews 1241Updated now 1 yearPublished 25/06/2021
1
Moving services between two Hostico customer accounts.Tutorials • Commercial | move | services | hosting | domain
In this tutorial, the necessary steps to move a service to another Hostico user will be presented.
by Mihai BobriucViews 1291Updated now 1 yearPublished 24/01/2022