Manually set up your email account in Outlook
Tutorials • Email | e-mail | outlook | manuallyIn this tutorial we will show you how to manually configure your email account in your Outlook email client.
by Ana RednicViews 1518Updated now 1 yearPublished 25/10/2018
Introduction
- In this tutorial, we will show you how to manually configure your email account in your Outlook email client.
Requirements
- E-mail address and password, Outlook e-mail client, the settings for the e-mail server.
- We can find the email settings in the cPanel account to E-mail accounts and click the Set up mail client next to the email account for which we want the settings.
Non-SSL Settings
User : florin.petran@hostico.ro
Password: Utilizaţi parola contului de e-mail.
Incoming server: mail.hostico.ro
IMAP Port : 143 POP3 Port: 110
Outgoing server : mail.hostico..ro
SMTP Port : 26
Steps
- Open the Outlook E-mail Client, then click File and then click Add Account.

- In the window that opens, click Manual setup or additional server types and then click Next>.

-
In the next window, we will click POP or IMAP and then click Next.

- In the fields below we will fill in the following information:
User information
-
Name of your email account and email address.
Server information
- You will click IMAP.
-
Email server for both incoming and outgoing, mail.hostico.ro.
Logon informations
- You will click Remember password.
- You will not click Require logon using Secure Password Authentication (SPA)
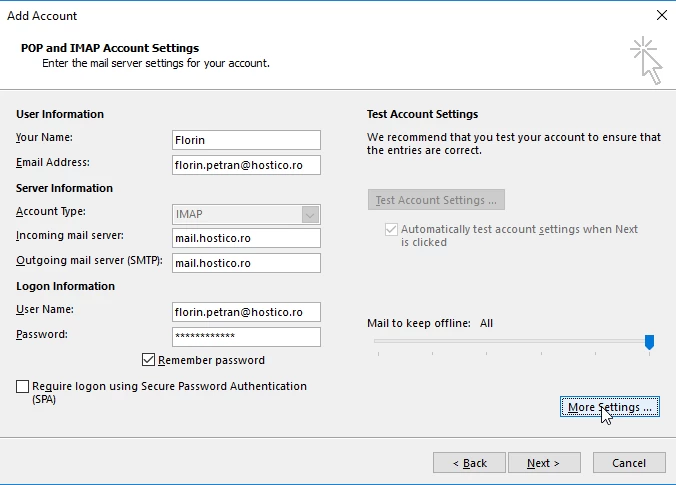
- Click on More settings, then click on Outgoing Server, where you will click My outgoing server (SMTP) requires authentication and you will make sure that the Use same settings as my incoming mail server is selected.

- Click on the tab Advanced, where we set the port 26 for the outgoing server (SMTP) if the default port 25 is blocked or filtered by the Internet provider.

- Click OK and then click Next.
-
The settings will be tested by the email client.

- Once the settings have been tested, we can close this window and finish the configuration of your email account by clicking Finish.

-
To set up your email account with SSL settings we will use:
User: florin.petran@hostico.ro
Password: Use your email account password.
Incoming server: hostico.ro
IMAP Port: 993 or POP3 Port: 995
Outgoing server: hostico.ro
SMTP Port : 465
-
We will use the above settings in the fields for which we have set the email account using non-SSL settings.
Similar Articles
2
Recurring payment activation.Tutorials • Commercial | payment | recurring | credit card | monthly
In this article, we will go through the steps required to enable recurring payment on Hostico services
by Mihai BobriucViews 1209Updated now 1 yearPublished 25/06/2021
1
Moving services between two Hostico customer accounts.Tutorials • Commercial | move | services | hosting | domain
In this tutorial, the necessary steps to move a service to another Hostico user will be presented.
by Mihai BobriucViews 1260Updated now 1 yearPublished 24/01/2022
How to install an SSL certificate in Wordpress Tutorials • Applications | install | wordpress | ssl | https | secure | http
This article will describe the steps required to implement the SSL certificate in Wordpress
by Ana RednicViews 1136Updated now 1 yearPublished 25/10/2018
Adding an email box to the Webuzo panelTutorials • Webuzo | email | webuzo | inbox
The Webuzo panel allows the creation of an unlimited number of email boxes, associated with hosted domains. This tutorial will explain the steps required to add a mailbox.
by Mihai BobriucViews 871Updated now 1 yearPublished 21/06/2017
Changing the space of a cPanel account from the WHM admin panelTutorials • WHM | whm | cpanel | quota | space | account.
This article explains how to change the space allocated to one or more cPanel accounts
by Mihai BobriucViews 821Published now 1 yearPublished 12/09/2022